This great article down below about Steps to Cleaning Your Sump Pump Properly is amazingly informative. You should investigate for yourself.
Sump pumps are essential components in several homes, specifically in areas susceptible to flooding or too much moisture. They help protect against water damage by successfully eliminating excess water from cellars or crawl spaces. Nonetheless, like any other device, sump pumps require normal upkeep to guarantee they operate properly when required the most. Cleansing your sump pump is a vital part of its maintenance, and understanding exactly how to do it effectively can conserve you from costly repair services and possible disasters.
Intro
Keeping a tidy sump pump is important for its appropriate functioning and long life. Neglecting this crucial task can cause blockages, breakdowns, and ultimately, water damage to your residential or commercial property. Consequently, finding out just how to clean a sump pump is critical for home owners that rely on these tools to keep their basements dry and protected.
Indicators of a Dirty Sump Pump
Understanding when your sump pump requires cleaning is critical for protecting against possible breakdowns. Some common signs that suggest a dirty sump pump include unusual noises throughout procedure, decreased water flow, and noticeable particles in the pit. If you observe any of these symptoms, it's essential to cleanse your sump pump without delay to avoid any further concerns.
Getting ready for Cleansing
Prior to you begin cleansing your sump pump, it's necessary to take some safety precautions. Begin by turning off the power to the pump to avoid any electrical accidents. In addition, wear appropriate safety equipment, such as gloves and safety glasses, to safeguard yourself from dust, debris, and potential virus.
Recognizing the Sump Pump
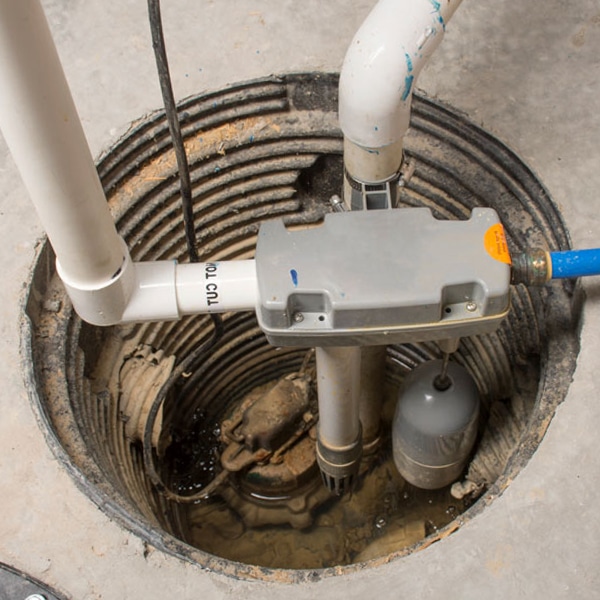
Prior to diving into the cleaning procedure, it's important to have a standard understanding of exactly how a sump pump functions. Typically mounted in a pit or container below the cellar flooring, a sump pump includes numerous key elements, including a pump, a float button, and a discharge pipe. When water builds up in the pit, the float button activates the pump, which after that pumps the water out via the discharge pipe, away from the building's structure.
Detailed Overview to Cleansing a Sump Pump
Shutting down the Power
Begin by separating the power supply to the sump pump to avoid any crashes while cleaning.
Checking for Proper Functioning
Before reinstalling the pump, carry out a fast test to make sure that the float switch triggers the pump properly. Pour some water right into the sump pit and observe the pump's operation. If every little thing is functioning properly, you can reassemble the pump and reconnect the power supply.
Removing Particles and Dust
Make use of a pail or a scoop to remove any kind of visible debris, dirt, or sediment from the sump pit. Dispose of the particles appropriately to stop it from blocking the pump or the discharge pipeline.
Cleaning the Pump and Float Change
When the pit is free from particles, thoroughly eliminate the pump from the pit. Evaluate the pump and the float switch for any kind of signs of damage or wear. Make use of a soft brush or towel to clean the surface areas and eliminate any kind of gathered gunk.
Flushing the System
After cleaning up the pump and float button, purge the sump pit with clean water to get rid of any type of staying dirt or debris. This will aid ensure that the pump runs smoothly and efficiently.
Upkeep Tips to Maintain Your Sump Pump Clean
Along with regular cleaning, there are several upkeep suggestions you can follow to maintain your sump pump in optimum condition:
Final thought
Cleansing your sump pump is a critical element of its upkeep and ensures that it runs successfully when you need it the most. By complying with the actions described in this guide and integrating regular maintenance right into your routine, you can expand the lifespan of your sump pump and protect your home from water damage.
8 Steps to Cleaning Your Sump Pump Properly
How to clean a sump pump
Before anything, make sure it’s not rainy outside, or you don’t have any appliances that drain into the sump pump basin. It’s important that there is no water coming into the area as you are working on the sump pump.
Disconnect the sump pump from the power supply. Unplug the sump pump or turn off the circuit breaker at the power source. DO NOT SKIP THIS STEP! Attempting to repair or clean a sump pump while connected to the power source is extremely dangerous. Wrap the pump. Save yourself from extra cleanup by wrapping the bottom of the pump itself in the plastic tarp/sheeting. Set the pump in an area that will allow you to access all sides for easy cleaning. Clean the pump. Now for the fun part. Start the cleaning process by spraying the pump with the garden hose. Once the pump is sprayed and all loose residue has been removed, use the scraping tool to remove any stuck-on debris. Rinse the pump. Spray the pump again with the garden hose, rinsing off any last residue that might be remaining. Drain the check valve. Keep your bucket handy while draining the check valve. Any water from the check valve will be caught in the bucket. Use the wet/dry vacuum to remove standing water from the sump pit. This step is self-explanatory. Use your shop vac to remove excess water from the sump pit. You’ll also likely need the shop vac to clean up any water or residue that might have made a mess of the cleaning space. Reconnect the pump. Reconnect the sump pump and make sure all components are situated in the sump pit as they were before you started the cleaning process. Reconnect the sump pump to the power source, and be sure to turn the breaker to the ‘on’ position if you turned it off during step two. https://www.bienvenu.com/blog/8-steps-to-cleaning-your-sump-pump-properly/
I have been very serious about How To Effectively Clean A Sump Pump and I hope you enjoyed reading the new post. Do you know about somebody else who is looking into the niche? Why not promote it. Kudos for being here. Please check our blog back soon.
View